DIY Yarn Wreath: Using Wedding “Leftovers”
So yesterday was my mommy’s birthday (her birthday tribute here) and I mentioned the DIY Yarn Wreath I made for her. Today I have the easy step guide to making your own. A few weeks ago while browsing Pinterest, I saw several of these crafty little things and thought- O.M.G. I have to try that!
Well…so of course my mom’s birthday was just a few weeks away and I knew I wanted her gift to be special, sentimental and somehow incorporate her recent Mother of the Bride role in my wedding as a “thank you” for all she did for me. So I was going berserk over what to get her and as soon as I saw the yarn wreath, I knew this would be the perfect gift.
AND because I’ve also been going berserk over what to do with all the wedding “leftovers” I still have sitting in my dining room- I realized I had the perfect “embellishments” already set aside! Most of you know, my mom and I sewed like 75 fabric flowers by hand (a future tutorial coming on those) and we hunted down a gazillion doilies for my wedding (btw-anyone need some?). So I knew I wanted to incorporate them somehow.
Basic Materials:
- Yarn
- Styrofoam or Straw Wreath Ring (I used a 12″ ring but any size would work)
- Wreath embellishments (buttons, fabric flowers, ribbon, doilies, whatever you want!)
From mine, I also wanted to add a hand stitched message so I bought:
- Embroidery floss
- Embroidery hoop
- Embroidery needles (I used size 10)
- Linen fabric (I used a very basic linen from Michaels)
Easy as 1, 2, 3…4!
1. Using a hot glue gun or another craft glue, glue one end of yarn to your Styrofoam wreath ring.
2. Begin wrapping yarn around the ring. Pull the yarn tight and do your best to keep the yarn close together. Try not to touch the yarn too much though because it can become slightly “fuzzy”. I was pushing or “scooting” the yarn close together a lot at first and noticed it was “fuzzing” up a little but probably not too much where one would notice. That’s just me being a perfectionist so I noticed.
3. Decide if you like it wrapped around once or twice. I knew I wanted a slightly thicker look so gave it a second wrap around with the yarn. This was the most time consuming part of the project. It took me about 2 hours to do two rounds of yarn. I just sat in front of the tube as my hubby watched college football one Saturday though so it wasn’t so bad. =)
4. Once you’ve wrapped the entire wreath, just add a dab of glue to the tip of the yarn and secure it to the wreath. Now you’re all set to add embellishments!
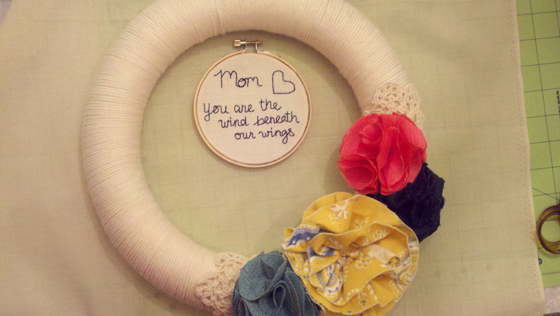
I also added a simple backhand stitched embroidered message. My mom has a whole craft and sewing room (yes, I get it from my mama) so I loved the idea of leaving the embroidered message in the embroidery hoop. Thought it “added” to the overall look of the wreath. I first wrote with pencil (very lightly) onto the linen and just stitched over it with navy thread.
Honestly just trying to figure out the placement of all my goodies was a hard task. I’m an extremely indecisive girl and a perfectionist so I just couldn’t figure out for the longest where everything looked best. So I just picked up the flowers, doilies, and the hoop and moved them about before I found their perfect places on the wreath.
Thanks to my hubby, he helped me create the final “design” or I would have been moving embellishments around for hours. Lol. Once I was happy with the placement of everything, I started hot gluing the pieces down to the wreath.
Ta-da! Here is the finished wreath again. I added a bow to the top and looped my hoop with some yarn through the bottom of the bow to hold it in place.
Some fun facts behind the embellishments…
Fabric flowers:
- Navy flower & ribbon- because that was the color dress my mom wore
- Yellow flower- the same fabric my mom’s fabric corsage was made out of
- Blue & coral fabric flowers- were two of my mom’s favs out of all the flowers we sewed (we actually used about 10 different fabric designs)
Doilies:
- We used doilies at each place setting (with a fabric flower placed on top of the doily) and my mommy helped come up with the concept
Embroidered message:
- Lyrics from our mother/daughter dance “Wind Beneath My Wings” by Bette Midler
Overall, I was happy with the way everything came out. I was sooo excited I could use some of my wedding “leftovers” and make a very special gift out of it. I’m thinking of pretty much duplicating it all over again and making one for myself!
Go ahead and pull out your goodies and think creatively about what you can remake out of them. I know there is so much you could do with those left over teal colored napkins, tea light candle holders, mason jars, or chalkboard signs! Before selling them or giving them away, think first about keeping just a few and do something with them that you can display in your home to remember your special day or give away as holiday or birthday gifts to your loved ones.
I’ve already bought a few more different colored spools of yarn and buttons for my next yarn wreath gifts! I have a few special ladies in my life celebrating their 1 year wedding anniversary and first home. And the holidays are coming up soooo…
Did you turn any part of your wedding day goodies into some form of new home decor or maybe even a gift? Or do you see a little bit of yarn wreath making in your future?


 Web design by